Rob Strain Fine Art Photography Logo
  • HOME - ROB STRAIN PHOTOGRAPHY
  • PORTFOLIO
    • ABSTRACTS
    • WANDERING
    • VIEWING
    • SLOTS & CAVES
    • GRAND CANYON
    • PUEBLOS & PETROGLYPHS
    • GROWING
    • BLOWING
    • SHINING
    • BREAKING
    • FLOWING
    • PRESCOTT SEDONA
    • SOUTHEAST
    • SWAMPS
    • MONOCHROME
    • WINTER
    • FALL
    • SPRING
  • FEATURED PRINT
  • HIRE, WORKSHOPS, ETC
    • GUIDING & WORKSHOPS
    • SOUTHWEST PHOTO WORKSHOPS
    • PHOTOGRAPHY WORKSHOPS
    • GRAND CANYON MONSOONS PHOTO WORKSHOP
    • 2025 MONSOONS ON THE RIM WORKSHOP
    • MOOD OF THE SWAMP PHOTO WORKSHOP
    • CADDO LAKE PHOTO WORKSHOP DETAILS
    • PRE-SESSION FORM
    • PORTFOLIO REVIEW
    • POST PROCESSING
    • TESTIMONIALS
  • NEWSLETTERS
    • APR 2025
    • FEB 2025
    • JAN 2025
    • NOV 2024
    • JUL 2024
    • JUN 2024
    • MAY 2024
    • APR 2024
    • MAR 2024
    • FEB 2024
    • JAN 2024
    • DEC 2023
    • NOV 2023
    • OCT 2023
    • SEP 2023
    • AUG 2023
    • JUL 2023
    • JUN 2023
    • MAY 2023
    • APR 2023
    • MAR 2023
    • FEB 2023
    • JAN 2023
    • DEC 2022
    • NOV 2022
    • OCT 2022
    • SEP 2022
    • AUG 2022
    • JUL 2022
    • JUN 2022
    • MAY 2022
    • APR 2022
    • MAR 2022
    • FEB 2022
    • JAN 2022
    • DEC 2021
    • NOV 2021
    • OCT 2021
  • BLOG
    • REINVENTING ONESELF
    • HIKING WITH BILL
    • ORIGINALITY & CREATIVITY
    • SWAMP HORRORS
    • DARK SIDE OF PHOTOGRAPHY
    • GRAFFITI VANDALISM
    • SATURATED PHOTO MARKET
    • LIARS & PHOTOGRAPHERS
    • AI & PHOTOGRAPHY
    • PHOTOGRAPHERS' SOLITUDE
    • GOAL SETTING
    • SWAMP REPORT
    • FIELD NOTES
    • AN EYE FOR ART
    • FINE ART PHOTOGRAPHY
    • HIRE A GUIDE , TAKE A WORKSHOP
    • LEAN ON LISTS
    • PHOTOGRAPHY IS A SPORT
    • CLIFF RAGE
    • THE ART OF COMMENTS
    • PRE-FORGIVEN
    • SIZE MATTERS
  • PHOTOBOOMERS
    • MASKS SIMPLIFIED
    • RADIAL FILTER MASK
    • SELECT OBJECT MASK
    • RANGE MASKS
    • NEGATIVE CLARITY
    • BUILDING FRAMES
    • DENOISE & SHARPENING
    • GALLERY REPRESENTATION
    • ART SHOW GUIDE
    • BORDER PATROL
    • MAKE IT POP!
    • SEEING HALOS
    • SEEING SPOTS
    • REFLECTED LIGHT
    • MODIFYING SATURATION
    • BE A GALLERY ARTIST
    • FINDING STYLE
    • MINIMALISM
    • BREAK THE RULES
    • LEADING LIGHT
    • KEEP IT SIMPLE
    • BALANCE YOUR COMPOSITION
    • CREATING DEPTH
    • FIND AN ANGLE
    • RULES & FRAMES
    • WHAT IS YOUR SUBJECT?
    • MISTAKES PHOTOGRAPHERS MAKE
    • TRIM BODIES ARE IN
    • CAMERA & LENS DECISIONS
    • TRIPOD SELECTION
    • BUY A BAG OR TWO
    • 3 IMPORTANT FILTERS
    • DAY 1 WITH CAMERA
    • DAY 2 - LEARN TO FOCUS
    • EXPOSURE CONTROL
    • CROOKED PHOTOGRAPHERS
  • DECOR
    • BUYING FRAMES
    • ART FESTIVAL SHOPPING
    • LIGHTING PRINTS
    • VALUE OF PHOTOS
    • COLOR BLINDNESS
    • HOW TO VISIT AN ART GALLERY
    • WALL ART PREVIEWS
    • B&W DARKROOM PRINTS
    • HANG IT!
    • COVER THAT PRINT
    • PRINT DECISIONS
    • WHY PHOTO SALES ARE SURGING
    • DETAILS MATTER
    • PRESCOTT ART GALLERIES
  • RESOURCES
    • GOLF COURSE PHOTOGRAPHY
    • RESEARCHING WEATHER
    • RESEARCHING LOCATIONS
    • VIRTUAL CONSULTATION
    • OUR PRINT FORMATS
    • SMART PRINT CHOICES
    • PRINTING SERVICES
    • E-books
    • CONTACT
    • I SHARED
    • FAQ
    • ABOUT
    • SUBSCRIBE
    • PRIVACY POLICY
  • FRAMES
  • PHOTOGRAPHY INSTRUCTION
  • Lightning Photography Guide
MENU
P:
Search

This is the second in a series of articles to help you create amazing photographic compositions. 

Part A - What is Your Subject?

Part B - Place & Frame Your Subject

Part C - Find an Angle

Part D - Creating Depth

Part E - Balance Your Composition

Part F - Keep It Simple

Part G - Lighting in Your Composition

Part H - Break the Rules

Part I - Minimalism and Negative Space

Placing & Framing Your Subject - Composition 101B

Last month we discussed “What Is Your Subject” with an emphasis on actually identifying a subject rather than just shooting away. In this article we are going discuss options on where to place the subject in your composition.

Most of us are acquainted with the Rule of Thirds and the Golden Ratio (or Golden Rule). These are two similar concepts that help us in subject placement. The Rule of Thirds suggests that we place our subject at one of the intersections of the vertical thirds and horizontal thirds of the frame.

NOTE THAT YOU MUST CLICK ON EACH IMAGE TO SEE AN ENLARGED VIEW CORRECT LINE POSITIONS WITHOUT CROPPED EDGES!

The first illustration shows the frame divided into nine equal sections. The inside points of the darker rectangles mark the intersection of the vertical and horizontal thirds. Many cameras have the ability to view lines that mark the thirds of your composition in the viewfinder, a great help especially for amateur photographers. The inside points of the second illustration mark the intersection lines that follow the Golden Ratio which is approximately 0.62:1. The Golden Ratio (also called “phi”) was developed from ratios that are found in nature. For example, these ratios are found in the arcs of a nautilus shell, in proportions on flowers and in the human body such as in the proportions of the sections of the upper extremities. I am not aware of any cameras that allow you to set up the Golden Ratio lines in the viewfinder.

The reason the rule of thirds tends to work can be found in taking a look at the similar Golden Ratio. Nature and our eye are basically programmed to like the Golden Ratio which is very similar to the Rule of Thirds. In fact, we find more beauty in faces that have many proportions that match the Golden Ratio. Perhaps this can be explained more completely by knowing something about our DNA.

Research has shown:

The structure of canonical B-DNA converges to Φin the ratio of the length:width of one turn of the helix; in the spacing of the two helices; and in the axial arrangement of the atoms. This is unexpected and suggests the action of some external process. The determination of what this process might be remains to be found, but is central to any understanding of the origin of life.
Source: “DNA Structure and the Golden Ratio Revisited” SH Larsen Symmetry 2021, 13(10).

So the question is, “Which one should you use?” My suggestion is that either can work. But in a composition with a lot of other elements, I am more likely to place the subject according to the Rule of Thirds. This gives more room for the other elements. If have a subject that follows mostly vertical of horizontal lines, I am would prefer the Golden Ratio. 

The next composition question is which one of those corners is best for the composition. Because we read left to right and because many of our subjects are not close up, the most comfortable location for a subject is in the upper right position (circled). But the best position is usually dictated by the other elements in your composition. It may be preferable to place your subject in another location. Take a look at these examples to see the use of these rules in actual photos.

You will rarely find a composition that fits so closely to the rule of thirds. It this case it is horizontal. But the two lower corners are also at the edge of the sand action. In a later article about using light to direct the viewer's eye you will see that it is rare to have almost all black in the middle of an image and have the image work well.


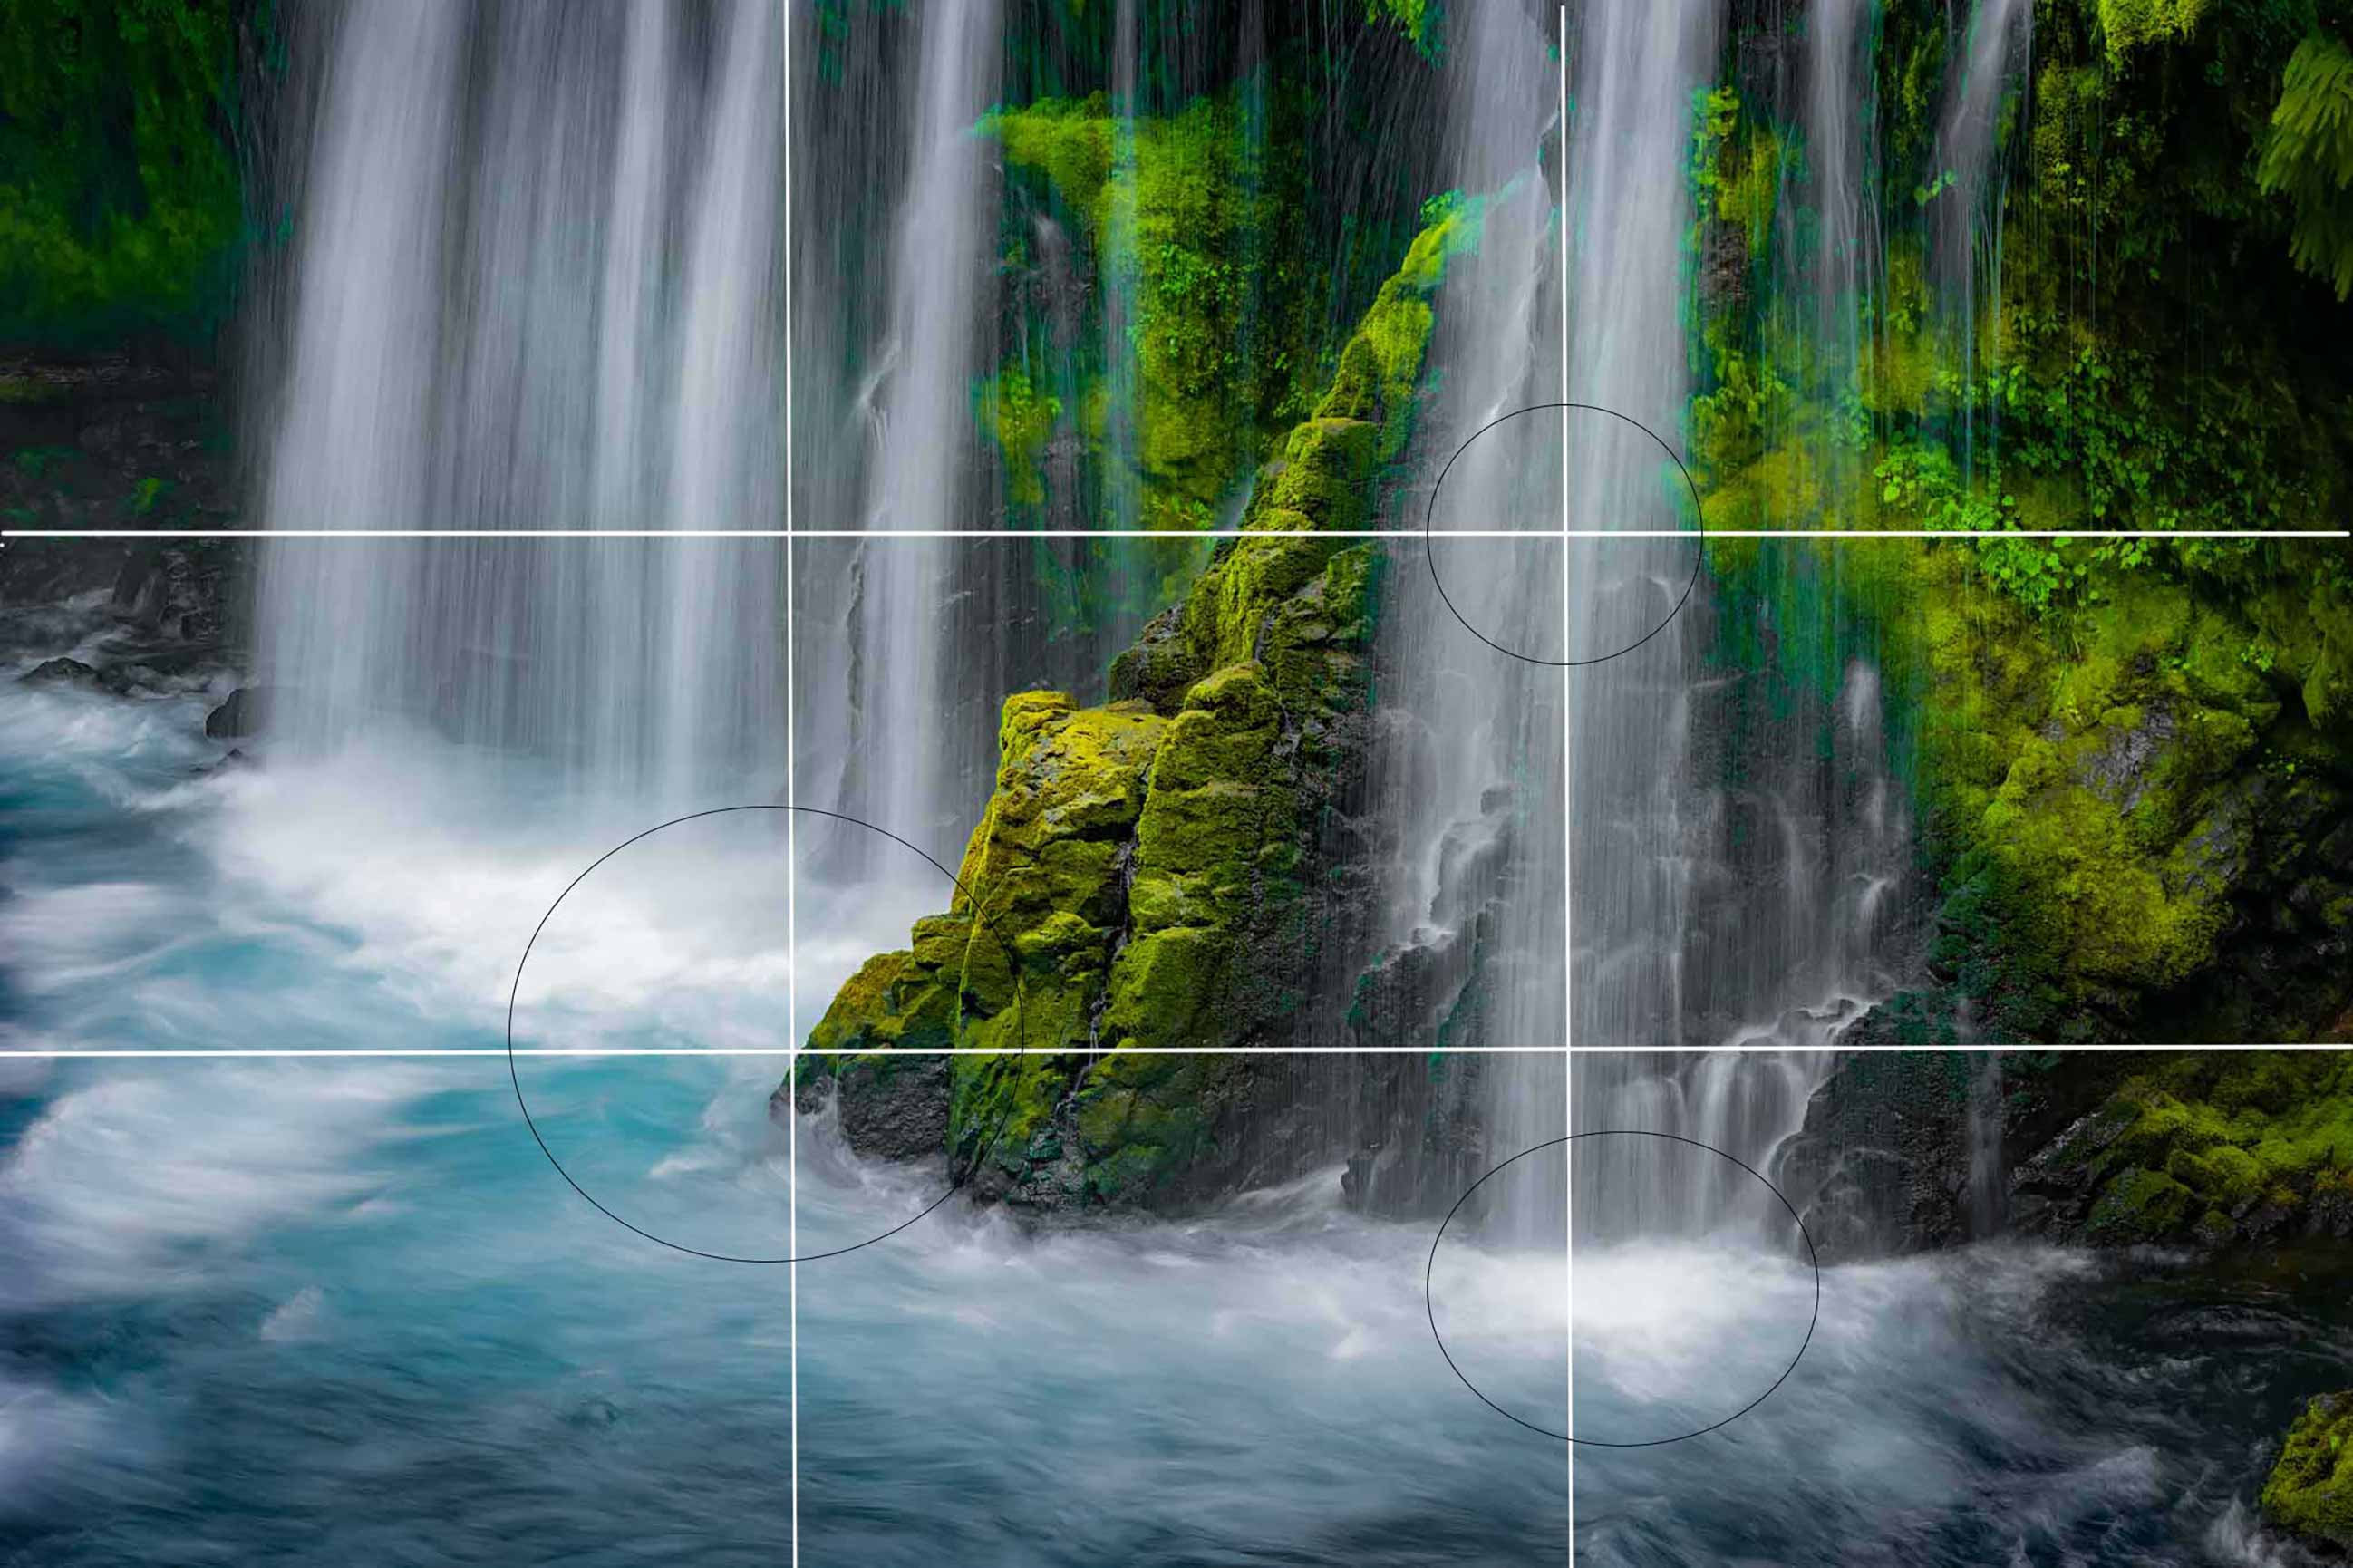
For the most part, this image follows the rule of thirds, but it is not so obvious. The primary action (subject) is at the lower left intersection. Lesser centers of action are shown with smaller circles. 

A somewhat more common position for the main subject is near the upper right intersection. Lesser subjects are shown with smaller circles.

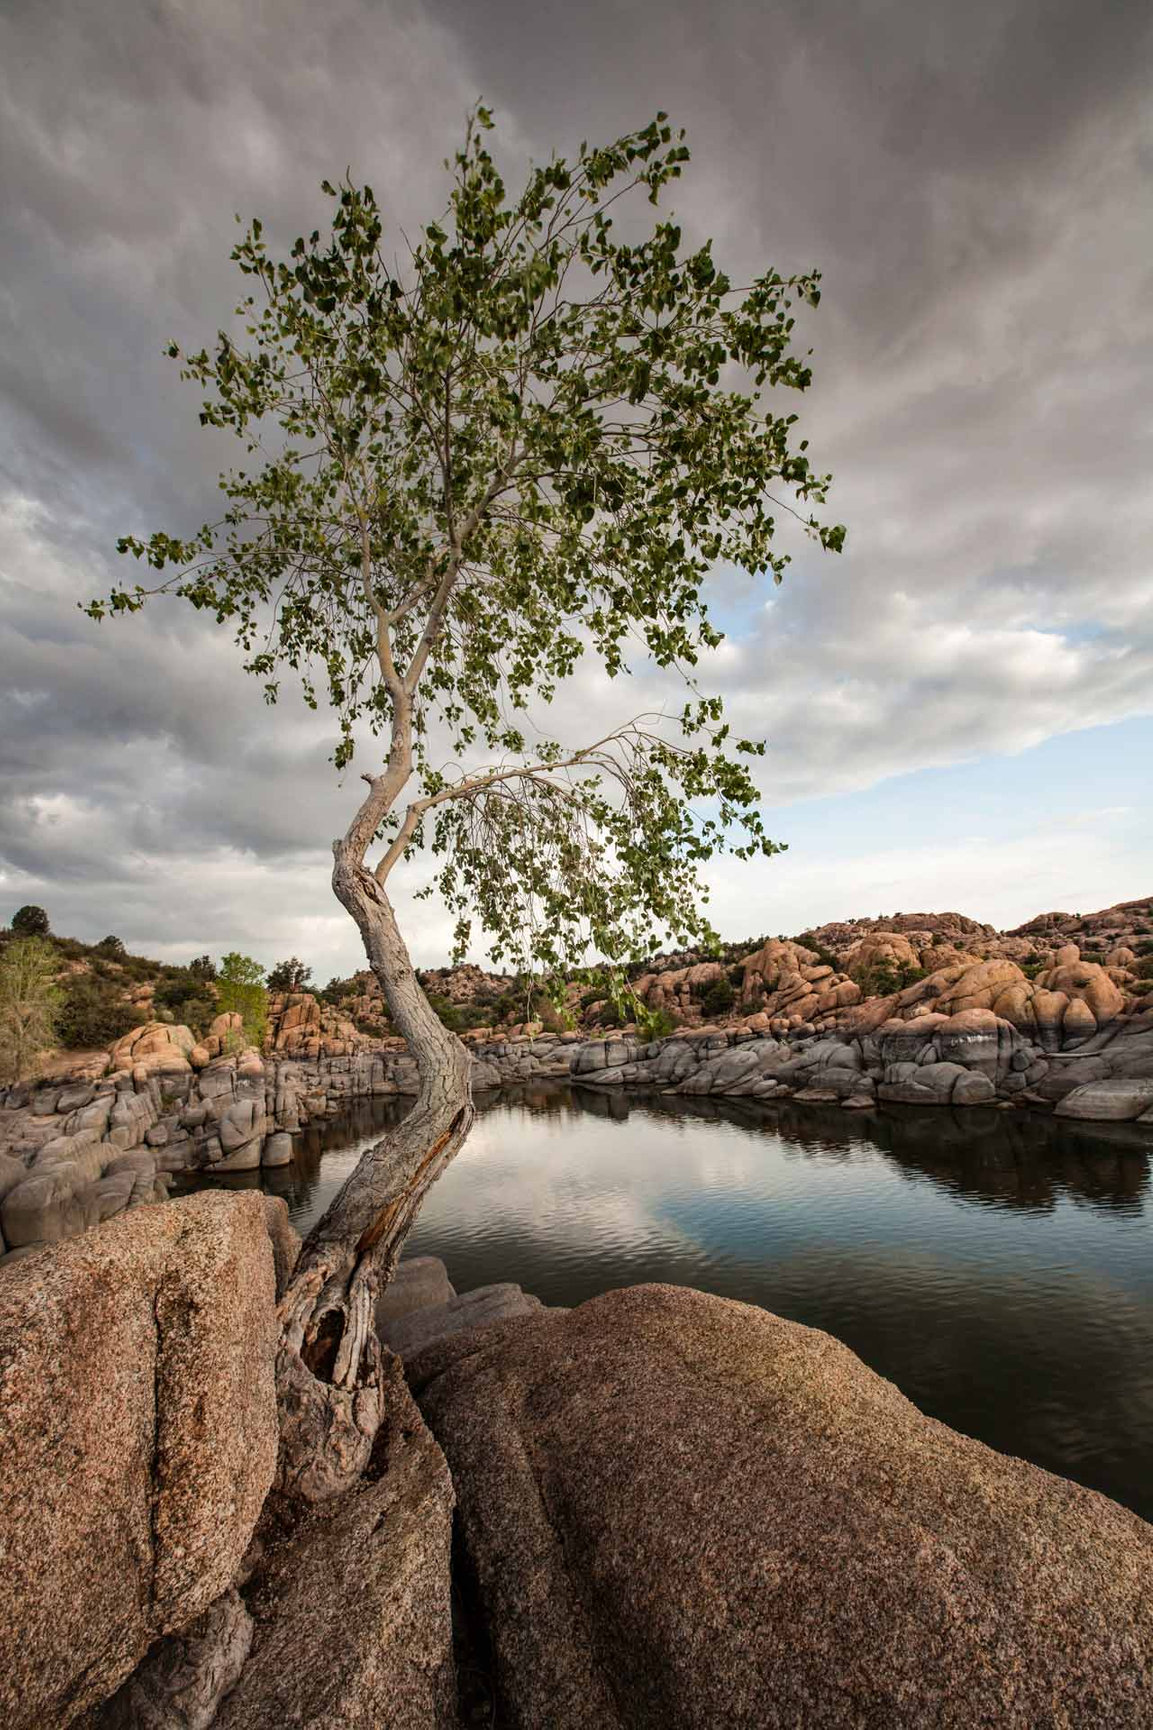
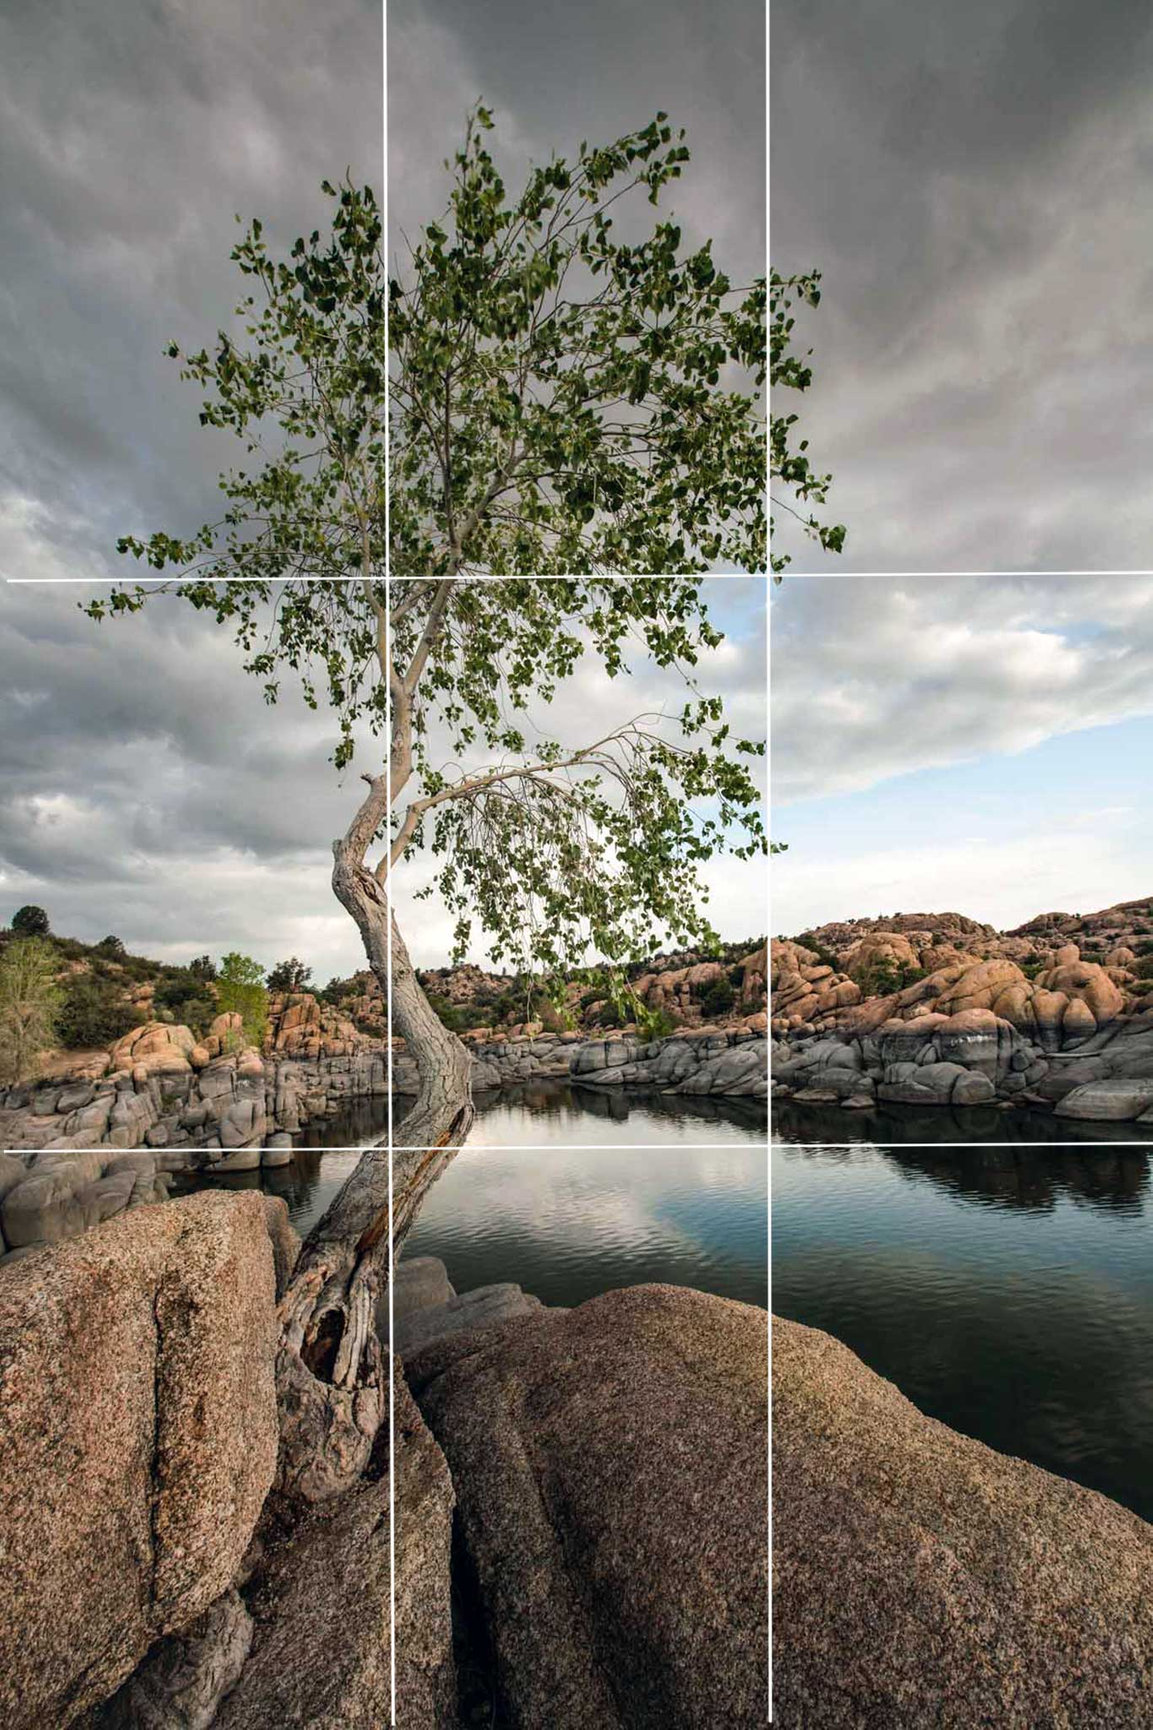
This tree is placed at the left vertical third. Placing it in the middle of the image would have blocked the ability to get deeper into the image. As start looking at your compositions, you may discover that the main subject and lesser subjects work quite well when they are positioned near two or three of the intersecting lines. This often creates a triangular effect that is pleasing to us. But placing subjects at all four intersections causes disharmony and is not as pleasing to our eye. For this reason, family portrait photographers often place multiple subjects in a triangular composition 

Framing the Subject

The purpose of a physical frame on the outside of a picture is to direct the viewer’s eye to the picture and then to help hold it there. Often picture frame can enhance the image by its color and design. Framing the picture within the composition is slightly different. It is helps direct and hold the viewer’s attention on the most important parts of the image, which often includes removing distractions on the outer areas of the image. 

Common framing methods include the use of trees (or limbs), rock outcroppings, structures or other area without distracting details. Since eyes are directed toward light, having a darker areas on the outside areas of the image can also be used to frame the subject. Some “framing the subject” techniques can be accomplished in post processing, but achieving this framing in the composition stage will usually provide the better result.

Although Ansel Adams used vignettes extensively, I recommend keeping them to a minimum especially in skies. They seem less natural in color photography than in black and white photography.

The following images are some examples of framing with comments.

In the images above, the shoreline boulders provide a frame for the primary subjects...the lake, reflections, island and sky. Trees, building walls, and canyon walls are often employed as frames.

In this image, the aspen tree could be considered a subject, but it's main purpose is to frame the valley and mountain in the distance. Try to avoid frequent use of overhanging foliage to frame the top of the image as this is a bit trite. The darker foreground also provides framing and gets the viewer into the image more quickly.

The corners of the image on the left received very limited vignette treatment. A heavier hand can work with black and white images, but tends to be more upsetting when the vignette hides color as it does in the image on the right. Rather than use a vignette tool, try using a gradient to selectively darken just the corners it benefits.

Little if any vignette would be helpful to this image. Note that if you vignette all corners, you can end up with corners that are too dark. An improvement would be made by cropping off the right side of the image.

The viewer's eye may also be directed to the subject by selective focus, usually created by using wider apertures or longer lenses or both as was the case of the bees on the saguaro blossom. A similar effect can be created with lenses such as the Lensbaby or center focus filters. The image on the left had blurring applied to the outside areas in post processing with a selective Orton Effect where I chose not to apply the effect in the center areas of the image.

Next month we look at "Finding An Angle". This is a great way you will differentiate your photography from what most people shoot.

CONTACT
CLIENT LOGIN
E: (click the E)
C: 714-292-5238

RESOURCES

Photo Printing Services Trim Bodies Are In Camera & Lens Decisions Tripod Selection Camera Bags 3 Important Camera Filters Day 1 with Your Camera Day 2 with Your Camera - Focusing Exposure Control - Camera Settings Crooked Photographers The Value of Photos Color Blindness How to Visit an Art Gallery Wall Art Previews Before You Buy Black & White Darkroom Prints How to Hang a Photo Print Glazing Options for Photos Print Decisions - Paper, Metal, Acrylic? Why Photo Sales are Surging How to Tell Photo Print Quality Lighting for Your Walls Prescott Art Galleries Golf Course Photography Art Show Guide  

PORTFOLIO PAGES

Abstracts Wandering - Scenes You Can Walk Into Viewing - Overlooks and Cliff Edges Spelunking? Underground Slot Canyons & Caves Pueblos & Petroglyphs Grand Canyon Growing - Trees, Plants, Flowers Blowing - Sand Dunes Shining - Stars & Night Skies Breaking - Waves & Ocean Shores Flowing - Rivers, Streams, Waterfalls, Lakes Prescott & Sedona Southeastern United States Swamps Winter Spring Monochrome  

BLOG

Swamp Horrors Dark Side of Photography Grafitti & Vamdalism AI & Photography Field Notes An Eye for Art Fine Art Photography Photo Workshops & Guides Using Lists for Photography Photography is a Sport Cliff Rage - Photographer vs Tourist Art of Social Media Comments Pre-forgiven - We All Mess Up Size Matters - Smaller Can Be Better Photographer's Solitude  

HIRE ROB STRAIN

Southwest Photo Workshops & Guiding Pre-Session Form Photography Portfolio Review Post Processing of Your Photos Caddo Lake Workshops Monsoons & The Grand Canyon Portfolio Review  
Crafted by PhotoBiz
Rob Strain Fine Art Photography Logo
CLOSE
P:
Search
  • HOME - ROB STRAIN PHOTOGRAPHY
  • PORTFOLIO
    • ABSTRACTS
    • WANDERING
    • VIEWING
    • SLOTS & CAVES
    • GRAND CANYON
    • PUEBLOS & PETROGLYPHS
    • GROWING
    • BLOWING
    • SHINING
    • BREAKING
    • FLOWING
    • PRESCOTT SEDONA
    • SOUTHEAST
    • SWAMPS
    • MONOCHROME
    • WINTER
    • FALL
    • SPRING
  • FEATURED PRINT
  • HIRE, WORKSHOPS, ETC
    • GUIDING & WORKSHOPS
    • SOUTHWEST PHOTO WORKSHOPS
    • PHOTOGRAPHY WORKSHOPS
    • GRAND CANYON MONSOONS PHOTO WORKSHOP
    • 2025 MONSOONS ON THE RIM WORKSHOP
    • MOOD OF THE SWAMP PHOTO WORKSHOP
    • CADDO LAKE PHOTO WORKSHOP DETAILS
    • PRE-SESSION FORM
    • PORTFOLIO REVIEW
    • POST PROCESSING
    • TESTIMONIALS
  • NEWSLETTERS
    • APR 2025
    • FEB 2025
    • JAN 2025
    • NOV 2024
    • JUL 2024
    • JUN 2024
    • MAY 2024
    • APR 2024
    • MAR 2024
    • FEB 2024
    • JAN 2024
    • DEC 2023
    • NOV 2023
    • OCT 2023
    • SEP 2023
    • AUG 2023
    • JUL 2023
    • JUN 2023
    • MAY 2023
    • APR 2023
    • MAR 2023
    • FEB 2023
    • JAN 2023
    • DEC 2022
    • NOV 2022
    • OCT 2022
    • SEP 2022
    • AUG 2022
    • JUL 2022
    • JUN 2022
    • MAY 2022
    • APR 2022
    • MAR 2022
    • FEB 2022
    • JAN 2022
    • DEC 2021
    • NOV 2021
    • OCT 2021
  • BLOG
    • REINVENTING ONESELF
    • HIKING WITH BILL
    • ORIGINALITY & CREATIVITY
    • SWAMP HORRORS
    • DARK SIDE OF PHOTOGRAPHY
    • GRAFFITI VANDALISM
    • SATURATED PHOTO MARKET
    • LIARS & PHOTOGRAPHERS
    • AI & PHOTOGRAPHY
    • PHOTOGRAPHERS' SOLITUDE
    • GOAL SETTING
    • SWAMP REPORT
    • FIELD NOTES
    • AN EYE FOR ART
    • FINE ART PHOTOGRAPHY
    • HIRE A GUIDE , TAKE A WORKSHOP
    • LEAN ON LISTS
    • PHOTOGRAPHY IS A SPORT
    • CLIFF RAGE
    • THE ART OF COMMENTS
    • PRE-FORGIVEN
    • SIZE MATTERS
  • PHOTOBOOMERS
    • MASKS SIMPLIFIED
    • RADIAL FILTER MASK
    • SELECT OBJECT MASK
    • RANGE MASKS
    • NEGATIVE CLARITY
    • BUILDING FRAMES
    • DENOISE & SHARPENING
    • GALLERY REPRESENTATION
    • ART SHOW GUIDE
    • BORDER PATROL
    • MAKE IT POP!
    • SEEING HALOS
    • SEEING SPOTS
    • REFLECTED LIGHT
    • MODIFYING SATURATION
    • BE A GALLERY ARTIST
    • FINDING STYLE
    • MINIMALISM
    • BREAK THE RULES
    • LEADING LIGHT
    • KEEP IT SIMPLE
    • BALANCE YOUR COMPOSITION
    • CREATING DEPTH
    • FIND AN ANGLE
    • RULES & FRAMES
    • WHAT IS YOUR SUBJECT?
    • MISTAKES PHOTOGRAPHERS MAKE
    • TRIM BODIES ARE IN
    • CAMERA & LENS DECISIONS
    • TRIPOD SELECTION
    • BUY A BAG OR TWO
    • 3 IMPORTANT FILTERS
    • DAY 1 WITH CAMERA
    • DAY 2 - LEARN TO FOCUS
    • EXPOSURE CONTROL
    • CROOKED PHOTOGRAPHERS
  • DECOR
    • BUYING FRAMES
    • ART FESTIVAL SHOPPING
    • LIGHTING PRINTS
    • VALUE OF PHOTOS
    • COLOR BLINDNESS
    • HOW TO VISIT AN ART GALLERY
    • WALL ART PREVIEWS
    • B&W DARKROOM PRINTS
    • HANG IT!
    • COVER THAT PRINT
    • PRINT DECISIONS
    • WHY PHOTO SALES ARE SURGING
    • DETAILS MATTER
    • PRESCOTT ART GALLERIES
  • RESOURCES
    • GOLF COURSE PHOTOGRAPHY
    • RESEARCHING WEATHER
    • RESEARCHING LOCATIONS
    • VIRTUAL CONSULTATION
    • OUR PRINT FORMATS
    • SMART PRINT CHOICES
    • PRINTING SERVICES
    • E-books
    • CONTACT
    • I SHARED
    • FAQ
    • ABOUT
    • SUBSCRIBE
    • PRIVACY POLICY
  • FRAMES
  • PHOTOGRAPHY INSTRUCTION
  • Lightning Photography Guide